How do I allow my viewer to choose their own path? #
You can let your viewer choose where they’d like to go next by utilizing the Auto-Advanace or Actions features. This is particularly helpful when adding a Main Menu so the viewer can go to the slides of the section they chose, then back to the Main Menu to choose another section!
What is Auto-Advance? #
When you want a slide to move automatically to another slide without any viewer action, this is called Auto-Advance. The presentation progresses on its own once the slide finishes.
What are Actions? #
Simply put, Actions are what make an iDecide presentation interactive. They allow viewers to choose what they want to see next, so they only explore the content that interests them most.

Using Auto- Advance #
To set a slide to auto-advance, click Slide in the left-hand menu, then select Auto-Advance. From there, use the Next Slide dropdown to choose which slide should play next.
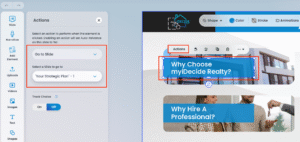
Using Actions #
When you want viewers to click a button or image to navigate to a specific section, you’ll use Actions. Simply click the button or image, select Actions, and choose an option from the dropdown. You can set it to go to a slide, open a link, toggle content, or finish the presentation.
Though iDecide and myiDecide aren’t meant to be linear, they can be! Slides that don’t have an interaction will default to the next slide in your timeline unless specified otherwise.
Tips #
– For a complete presentation experience, your presentation must include an “Intro” slide and at least one “Closing” slide.
– Naming your slides will help you stay organized when choosing your Next Slide destinations and Actions.